Showing posts with label makeup tutorials. Show all posts

Tuesday, November 20, 2012

Everyday Subtle Smokey Eye Tutorial [Video]

I cannot get enough of smokey eye looks because it makes the eyes appear sexy, and add a hint of drama to the look. I love neutral eyeshadows because you can wear them anytime of the day, and on any special occasion. You can easily mix and match the colors to create different kinds of look.

This everyday subtle smokey eye look is very easy to do even for newbies, and all the products I used are affordable yet good-quality makeup.  If you like this look and want to see how it's done, please watch the video.


Products Used:

Face
Maybelline Pure Liquid Mineral Foundation B01
Maybelline Angel Fit Concealer #02
BYS Concealer in Light
Revlon Translucent Loose Powder #2
Nyx Powder Blush in Silky Rose

Eyes
Revlon Matte Eyeshadow in Rich Sable (as brow color)
Elf 32 Piece Warm Eyeshadow Palette
The Face Shop BK904 Eyeshadow
CoverGirl Lash Blash Mascara in Black

Lips
Maybelline Baby Lips Pink Glow in Pink Blast

Brushes
San San Angled Fluff Brush
Elf Essential Eyeshadow Brush
Elf Essential Blending Brush
Generic Big Fluff Brush
Elf Stipple Brush


This look is very wearable and daytime appropriate. You can wear this to work, but maybe you can change the blush to a more neutral shade like a mauve or peachy shade if you're not comfortable with flushed cheeks. This blush look very natural though and blends well with the skin making you appear like you are blushing.

I'm quite happy with how this turned out because it made me look fresh and well rested even if I was pretty tired when I did this. Check out the eye bags, lol! I normally just wear one-color shadow when running errands but there are moments when I like to work on my makeup a bit so I look more polished. I especially add more effort when I'm tired or sick, and need a bit of a kick on my face to give me a boost :).

I hope you like this quick and short tutorial! Have a good night/day everyone! :)


Sunday, February 6, 2011

Berry Chocolate Romantic Look


Here's the look I created using these LA Colors Flip Top Eyeshadow and is great for Valentine's Day. Hope you like them! :D


Products Used

Eyes

LA Colors Flip Top Eyeshadow in PE210 Pink Champagne, PE211 Berry, and PE225 Chocolate
CoverGirl Eye Enhancers in Mauveberry
Elf Cream Eyeliner in Coffee
L'oreal Volume Shocking Waterproof Mascara in Black
Ever Bilena Advanced Eyeshadow in Auburn Glaze

Lips

Cover Girl Wet Slicks Crystals in Fire Fly
Avon 24k Gold Lipstick in Golden Peach
L'oreal Endless Kissable Lip Color in Finest Wine #710

Face

Tony Moly BB Cream
Avon Ideal Shade Concealer Stick in Medium
Revlon New Complexion Loose Face Powder # 02
ELF Healthy Glow Bronzing Powder in Sun Kissed
Maybelline New York Blush in Dusty Rose


Here are the steps to achieve this look:

1.) Prep your face with moisturizer
2.) Apply enough amount of BB Cream all over the face and lids to serve as a base 
3.) Cover blemishes with concealer
4.) Brush loose powder lightly over the face to set the bb cream and concealer
5.) Apply CoverGirl Eye Enhancers in Mauveberry lightly to the brow bone as the highlight color and blend it to the crease area. 
6.) Place LA Colors Pink Champagne on the inner half of the lid 
7.) Apply Berry on the outer half of the lid and bring it up to the crease
8.) Apply Chocolate on the outer v or outer corner blending it to the crease and blend with Berry to give the eyes more definition.
9.) Line upper lash line using the cream eyeliner as well as the lower water line to give is a more defined shape
10.) Apply Chocolate shadow over your lower lash line
11.) Define your eyebrows using your favorite eyeshadow or eyebrow makeup/pencil. This time I used Ever Bilena eyeshadow as it matches the color of my hair. I just tried it and I am liking the pigmentation on my brows.
12.) Curl your lashes and apply mascara on your upper and lower lashes
13.) Contour cheeks with Elf bronzing powder
14.) Lightly brush the remaining bronzing powder to the temples, forehead down, jaw bone, jaw line, and  chin to give the face an even healthy glow
15.) Apply lipstick/lip gloss over the lips. 


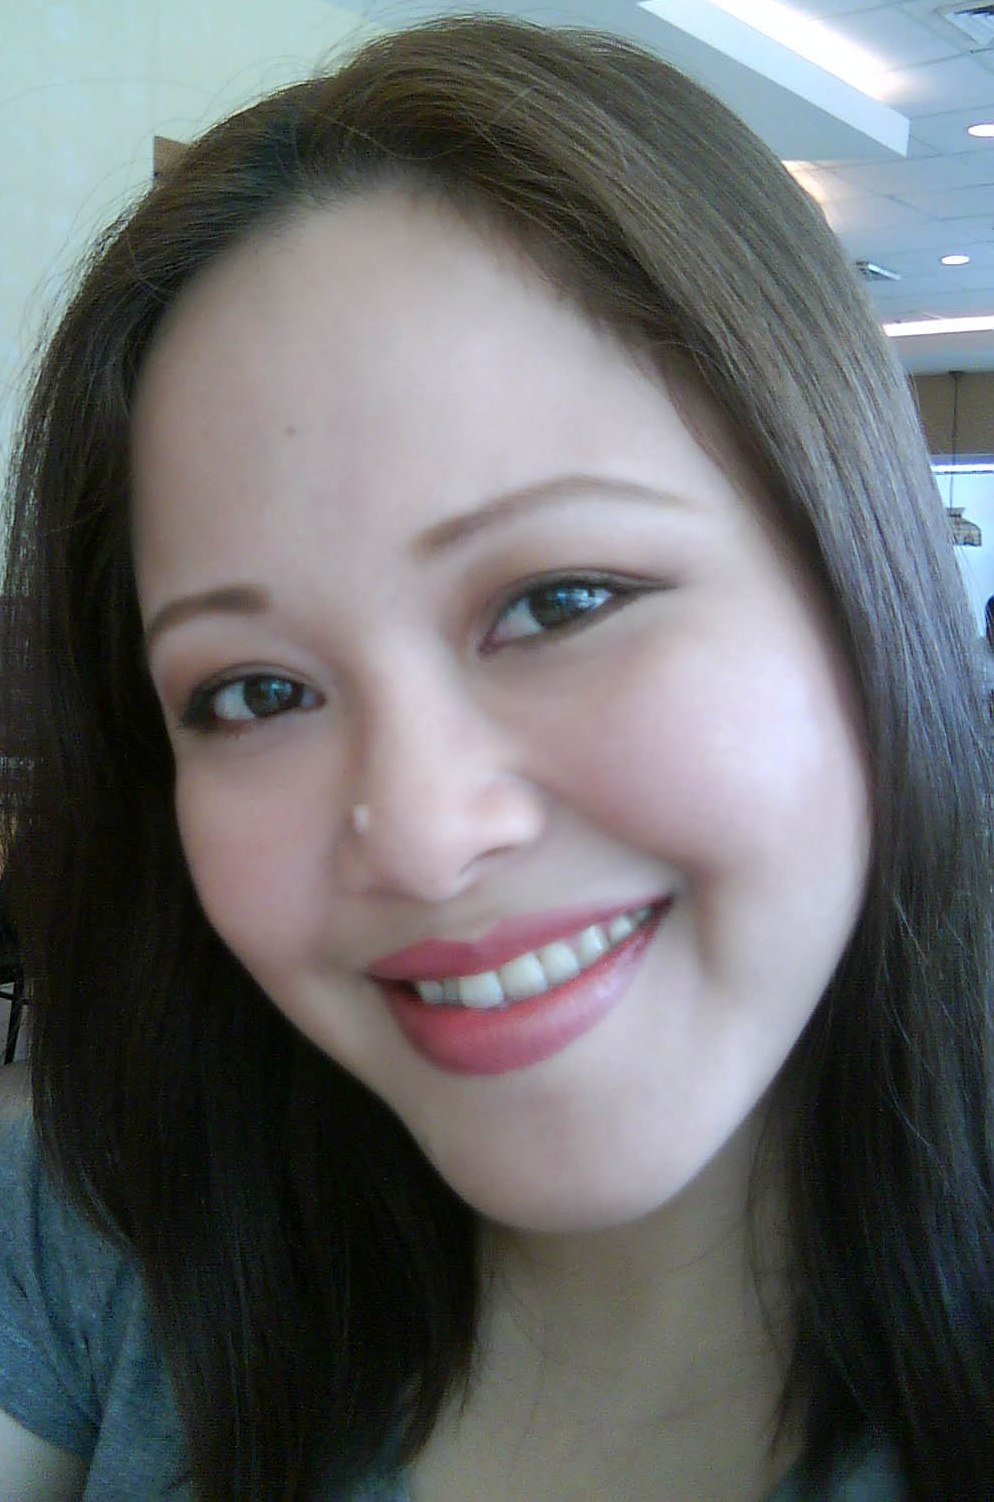
Here's the completed look. Since the eyes are very dramatic I used a nude lipstick but it's definitely convertible. I changed it up using a darker lipstick to make it more romantic and bold, and lip gloss on the last image to make it look sultry but not too strong.


Using Avon 24K Gold Lipstick in Golden Peach


L'oreal Endless Kissable Lip Color in Finest Wine #710

Cover Girl Wet Slicks Crystals in Fire Fly

Hope you like this look! Thanks for reading :D


Thursday, February 3, 2011

FOTD: Smokey Taupe Eyes Using Maybelline EyeStudio


Here's another easy to do smokey eye look using Maybelline Studio Banana Split Quad. I'm into browns and taupe eyes recently because it's very wearable and looks well with any outfit. It's still cold and gloomy today so I didn't want to wear bright makeup. I'll save a different look on my next FOTD. In the mean time, here's how to do this look:


Products Used

Eyes
Maybelline EyeStudio Quad in Banana Split
Maybelline EyeStudio Brow Definist in Brown
L'oreal Volume Shocking Waterproof Mascara in Black

Lips
Cover Girl Wet Slicks Crystals in Sassy

Face
Tony Moly BB Cream
Avon Ideal Shade Concealer Stick in Medium
Revlon New Complexion Loose Face Powder # 02
ELF All Over Color Stick in Pink Lemonade
ELF Healthy Glow Bronzing Powder in Sun Kissed


Here are the steps:

1.) Prep your face with moisturizer
2.) Apply enough amount of BB Cream all over the face and lids to serve as a base 
3.) Cover blemishes with concealer
4.) Brush loose powder lightly over the face to set the bb cream and concealer
5.) Apply the highlight color (first eyeshadow on the palette) lightly to the brow bone and the crease area. This will help blend the crease color well and prevent appearance of harsh edges.   
6.) Place the second color all over the lid 
7.) Apply the pink shadow on the outer third of your lid and blend it well with the lid color
8.) Place the darker brown shadow on the outer color blending it with the pink shadow. Bring the darker brown color to the crease and blend it lightly. 
9.) Line the lower lash line with the dark brown shadow
10.) Define your eyebrows using your favorite eyeshadow or eyebrow makeup/pencil 
11.) Curl your lashes and apply mascara on your upper and lower lashes
12.) Lightly tap the Elf All Over Color Stick on your fingers to warm it up a little and gently pat it on your cheeks and blend
13.) Lightly brush the bronzing powder on top of the color stick bringing it up to the temples and forehead down to the jaw bone and the chin to give the face a healthy glow
14.) Apply lip gloss over the lips. You can a wear lipstick before the gloss to make your lip color stay on more.


Here is the completed look. It's a simple makeup routine without using too much makeup products.

Friday, January 28, 2011

Elf Cosmetics Soft And Neutral Look


On this look I used mostly ELF Cosmetics aside from mascara, brow color, and pressed powder because I don't have these from ELF yet. I always believe that one don't need to use expensive makeup to look pleasing. Cheap but quality makeup products can also make you look pretty.

Here are the steps to achieve this look.

1.) Prep your face with moisturizer
2.) Take a pea size or two of Elf Tinted Moisturizer SPF15 and blend it on your face and neck
3.) Use Elf All Over Color Stick to conceal your blemishes
4.) Using a face brush, apply pressed or loose face powder all over your face
5.) Apply the olive green shadow from the Elf Duo Eyeshadow Cream on the inner 2/3 of your lid and blend it well.
6.) Place the dark color from the duo on the outer corner of your lid and bring it to your crease a little. Be careful not to use too much because this creases a lot. This shadow is pigmented so you only need a few product.
7.) Using Elf Cream Eyeliner tight line your upper and lower water line and blend it to your lower lash line. You may also line your upper lash line if you want
8.) Define your brows with your brow color
9.) Curl your lashes and apply mascara on your upper and lower lashes
11.) Rub the b Elf All Over Color Stick on your fingers to warm it up a little and gently pat it on your cheeks and blend
12.) Using a blush brush, apply Elf Healthy Glow Bronzing Powder on your cheeks
13.) With the remaining bronzer on your brush, bring the color up to your temple, jaw bone, and chin for an even glow
14.) Apply Elf Super Glossy Lip Shine SPF15 on your lips

Now you're done. It's very easy and not too much work is required. Here is the completed look. Very soft and neutral.


Products Used:

Eyes
Elf Duo Eyeshadow Cream in Olive
Elf Cream Eyeliner in Coffee
L'oreal Voluminous Mascara in Blaskest Black
Maybelline New York Eye Studio Brow Definist in 02 Brown

Lips
Elf Super Glossy Lip Shine SPF15 in Candlelight

Face
Elf Tinted Moisturizer SPF15 in Apricot Beige
Elf All Over Color Stick in Apricot Beige
Elf All Over Over Stick in Pink Lemonade
Maybelline New York Shine Free Pressed Powder in Natural Beige


Reviews of Elf face products to follow soon. Hope you like this! :D


Simple and Easy Polished Look Tutorial

This look is simple and easy to do yet you appear polished. The eye makeup is very subtle and is wearable for during the day for running errands or even for work. It only takes about 15 minutes to do this look so it's ideal if you are in a hurry but you look like you spent a lot of time doing your makeup. So without further ado here are the steps.


1.) Prep your face with moisturizer or a face primer
2.) Blend just the right amount to bb cream or foundation or tinted moisturizer on your face. I love using bb creams because it has more coverage than a tinted moisturizer and lesser compared to a foundation. 
3.) Cover blemishes with concealer
4.) Apply a thin layer of loose powder using a face brush. Loose powder gives you a more natural finish and it doesn't cake, but you can use any translucent pressed powder as an alternative. Be careful to sweep it lightly on your face so you don't wipe off your bb cream or foundation.
5.) Take a thin layer of the lighter shade from Elf Mocha Swirl Duo Eyeshadow Cream eyeshadow and apply it on the inner 2/3 of the eyelid as base blending it well to avoid creasing. Take a little the darker color from the duo and place it on the outer third of the lid. 
6.) Pack on the Cover Girl Eye Enhancers in Mauveberry on top of the lighter base color.
7.) Apply the shimmery brown color from the Maybelline Eyeshadow Quad on top of the darker base shadow, bring it up to the crease, and blend it well.
8.) Using a slanted eyeliner brush place Cover Girl Eye Enhancers in Shimmering Onyx or any black shadow on the outer third of the upper lash line and bring it down to the lower lash line. 
9.) Lightly place Cover Girl Eye Enhancers in Pink Chiffon over the brow bone for highlight. 
10.) Define your brows by first using the wax from the Maybelline Brow Befinist and then set it with the brow powder 
11.) Curl your lashes and apply mascara on the upper and lower lashes
12.) Take a big face brush and apply the Lumene bronzer on your face drawing a 3 and an E (brush the bronzer starting from forehead and bringing it down to your cheeks, and then down to the chin drawing a 3 and then doing the other side of the face drawing an E). 
13.) Apply Annabelle Blush which is just a golden bronze shade or any blush color on the apples of the cheeks and blend the excess with the bronzer. 
14.) Apply L'oreal Endless Kissable Lip Color In Finest Wine or any nude lipstick for a simpler look. 


Here is the completed look!


Products Used

Eyes
Elf Mocha Swirl Duo Eyeshadow Cream
Cover Girl Eye Enhancers in Mauveberry
Cover Girl Eye Enhancers in Shimmering Onyx
Cover Girl Eye Enhancers in Pink Chiffon 
Maybelline New York Eye Studio Eyeshadow in Banana Split 
Maybelline New York Eye Studio Brow Befinist in 02 Brown
L'oreal Voluminous Mascara in Blackest Black

Lips
L'oreal Endless Kissable Lip Color In Finest Wine

Face
Tony Moly BB Cream
BYS Concealer in Light 
Revlon New Complexion Loose Face Powder Translucent 02
Lumene Terracotta Powder in Dark Glow 01
Annabelle Blush in 1L1


Wednesday, January 26, 2011

Smokey Blue Eyes Tutorial

Avon Denim Quad
White Pearl/Blue/Night Sky/Deep Sea


Been playing with my oldie but goody eyeshadows and I came across this Denim Quad from Avon that was given to me by my Aunt as well together with my cocoa glow quad. I hardly use this quad because it's a little dramatic for me so there's still a lot of product left. So I decided to create a smokey eye using this quad. These are matte shadows except for White Pearl which as the name says is a pearl shade that's good as a highlight. Let's get on to the steps to create this smokey eye.


Steps:

1.) Apply an eye primer so the color sticks well and stays long. This also helps the color to pick up more.
2.) Apply the lightest color which is Blue to the inner half of the lid. You can build it up by slowly patting the color in
3.) Apply Night Sky in the outer half of the lid and blend well with the Blue shadow you previously applied on your lid. Pack on more colors by layers to build up the color and to not look cakey.
4.) Bring up the Night Sky shadow to your crease and blending it well back and forth "windshield wiper" motion to define your crease.
6.) Take Deep Sea and apply it on your outer v or outer corner of your eyes to define it.
7.) Take a clean blending brush and blend the edges.
8.) Lightly apply highlight color to your brow bone especially if you are using a pearl shade shadow.
9.) Take the darkest shade on the palette and use it to line your lower lash line or use an eyeliner.
10.) Curl your lashes and apply your mascara.


Here's another shot in a different lighting to show how dramatic this smokey eye is in person. 


I would wear a light pink or any neutral blush and a light pink or nude lipstick because the eyes are already very dramatic. it will also draw more attention to your sexy eyes. You may also wear a blue glitter eyeliner and false eyelashes if you are wearing at night for a sultry look.


Sunday, January 23, 2011

Neutral Brown Eyes Tutorial


I have an oldie but goody eyeshadow quad that I really really love using and that's the Avon True Color in Cocoa Glow. I don't know if the Avon outlet here has this same exact quad because my Aunt got me this in Canada plus the fact that this is an oldie quad. However, any brown toned shadows will do. This particular quad has all the colors you need to achieve a sexy smokey eye you can wear during the day or even at work. It's not too dramatic and that's what I love about it. For those interested to know the name of the shades, starting from left to right they are Vanilla, Rose Gold, Chestnut, and Chocolate. These colors are really pretty and I use it more often than my other eyeshadows.

Here are the steps to achieve this look:

1.) Moisturize your face
2.) Apply bb cream all over your face and neck
3.) Pat in concealer on your blemishes and under eye
4.) Dust loose powder lightly over your face and neck
5.) Apply eye primer all over the lid to help your eyeshadow pick up more and last longer (optional)
6.) Apply Rose Gold shade on the inner half of your lid
7.) Apply Chestnut to the outer half of the lid and blend it over to your crease
8.) Apply Chocolate to the outer v or outer corner and bring it down to the lower lash line
9.) Apply Vanilla to the brow bone and then blend it down to the crease to blend out the harsh edges
10.) Define your brows using the wax from the Maybelline EyeStudio Browdefinist and then set it with the powder color
11.) Curl lashes and apply mascara on upper and lower lashes
12.) To contour your cheeks, do a fish face and apply the bronzer below your cheeck bones and blend it well.
13.) Bring the excess bronzer up to your temple, forehead, and down to your jawline and chin
14.) Apply blush just on the apples of your cheeks and blend the excess to your bronzed cheeks
15.) Apply lipstick and top it off with lip gloss


I love the pigmentation of this quad because a little goes a long way. It's very buildable and blendable which helps achieve a clean smokey eye look. I didn't use eyeliner anymore because I don't want it to be too dramatic for day use.


Products Used:

EYES
- Avon True Color in Cocoa Glow
- Maybelline EyeStudio Browdefinist in 02
- Loreal Voluminous Mascara in Blackest Black

LIPS
- Maybelline Moisture Extreme Lipstick in Light Berry
- Revlon ColorStay Mineral Lipglaze in Everlasting Blush

FACE
- Tony Moly BB Cream
- BYS Concealer in Light
- Revlon New Complexion Loose Face Powder Translucent in 02
- Lumene Terracotta Powder in Dark Glow 01 for contour
- Maybelline Expert Wear Blush in Dusty Rose


Here is the finished look! As you can see it's a great look for daytime and even for work. Very neutral and doesn't look like you have too much makeup on.


You can convert this to a night look by tight lining your water line with a brown or black eyeliner and use a wine or deep red lipstick. Hope you all like this! :)


Saturday, January 22, 2011

My Favorite Makeup Artists

Do you youtube? If you do and you watch makeup tutorials, you should already know PIXIWOO. They are sisters who are really gorgeous and have the gift of art. They can do any look and I am just extremely impressed of their talents. When I am stressed, I pause and watch their videos and I will feel better after 3 videos. It's just amazing how great they work on their makeup products to come up with a stunning look all the time. They use high end makeup products like Chanel, MAC, YSL, Estee Lauder, MUF, Laura Mercier, etc which adds to the intensity of how spectacular the finished look is. If you don't know who they are yet, check out their youtube channel. I love all of their tutorials and this video is one of my favorites.


Signup to receive the latest updates straight to your inbox

* indicates required